Sourdough Bread

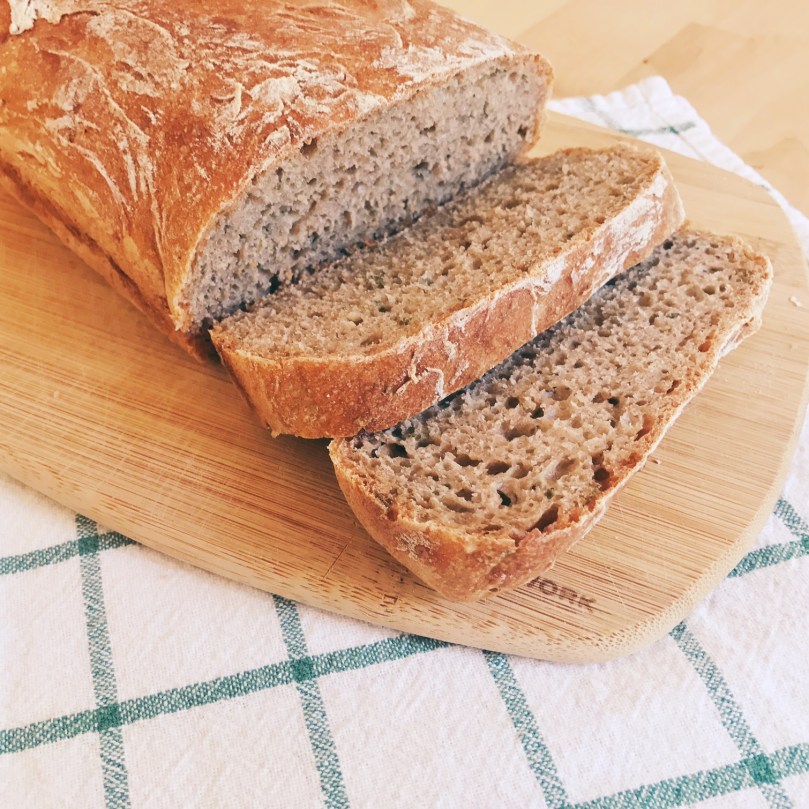
A few weeks ago a friend brought me my first ever sourdough starter! I’ve wanted to try making sourdough for a long time, but it always seemed like a daunting task, even for an experienced baker! So I got on youtube, watched everything I could find, and decided to go for it! This recipe is my best attempt to compile my resources, helpful tips and instructions based on trial and error. Here goes!

If you’re an inexperienced baker, I recommend watching BOTH of these youtube videos before beginning this process!
Sourdough Basics: https://youtu.be/bSYdABrPrtM
Mistakes & Tips: https://youtu.be/BJEHsvW2J6M

This cheat sheet is a really great way to see what time of day you should begin the process of baking your sourdough. It will be a minimum of 18 hours.
Timing Cheat Sheet: https://bit.ly/2UmScvw


If you can get a sourdough starter from a friend, wonderful! If not, here’s a great how-to video on how to make your own from scratch! It will take 7 days, but I promise it’s worth it!
Starter How-To: https://youtu.be/sTAiDki7AQA


Supplies & Ingredients:

Kitchen Scale
• Large glass or stainless steel bowl
Banneton Proofing Basket OR a clean kitchen towel (be sure it has a tight weave to prevent sticking)
Bread Scoring Tool or sharp knife
• Dutch Oven (don’t have one? Use a baking sheet, or a large pot with a lid)

• All Purpose Flour
• Whole Wheat Flour
• Rye Flour (For feeding your starter. Not necessary, but makes it even more tasty!)

• Activated Sourdough Starter
• Iodized Salt
• Water

• Feeding your starter •

40 Grams (~4 tbsp) White or Rye flour
40 Grams (~3.5 tbsp) room temp water
(80 grams total)

Add flour and water. Mix with a chopstick until combined. Replace lid loosely. Feed it everyday if you plan to bake. Ideally, feed your starter & autolyse your dough at the same time. If you’re not baking, place the starter in refrigerator for up to 4 days to slow fermentation.

• Autolyse •

Mix flour and water together with one hand to form a shaggy mass.
Autolyse is a technique that is easily introduced into your bread making routine and delivers a dough that’s easier to work with and shape, and a loaf with better texture, rise and flavor.
340 grams of room temperature Water
400 grams of white bread flour
100 grams of wheat bread flour

2-7 hours later …
Add starter and salt to the dough. Incorporate dough with your hand, salt and starter.
12 grams of salt
60 grams of starter (starter must be activated & bubbling)

30 minutes later….
Using the stretch and fold technique (watch the youtube videos!), work your dough. Use a small bowl of water to wet your fingers, and sprinkle water on the dough so it doesn’t stick to your hands. Repeat this every 30 minutes for 2 – 2.5 hours (about 4 times), until you feel the dough has developed a nice gluten structure (stretchy).

• Bulk Rise •

After you stretch and fold your dough, it’s time for your bulk rise (otherwise known as proofing). Allow the dough to rise, in the bowl, covered with plastic wrap for 3-8 Hours at room temp (70-75°) or 12-20 Hours (or overnight) in the refrigerator.
I don’t love proofing my dough in the fridg! If you need to, for the sake of time, you’ll need your dough to come back to room temp before baking!
Let dough proof until it has risen 30-50% in size.

• Pre-Shape & Bench Rest •

Once you’re satisfied with your bulk rise. Turn out the dough onto a lightly floured surface, use your fingers to free the dough from the sides of the bowl. Using the stretch and fold technique, pre-shape your loaf into a round. Allow the dough to rest on the counter, covered, for 30 minutes.

• Final Shaping & Proofing •

Flour your proofing basket really well. Give your loaf one final shaping and put it, bottom side up, into the floured proofing basket. If you don’t have a banneton (proofing basket), flour a kitchen towel, place it inside of a bowl, add dough, and cover with plastic wrap. Allow your dough to proof at room temperature for 2-3 hours, or until it bounces back when you lightly poke it.

• Baking •

Preheat the oven to 500°. Place the Dutch oven into the oven while preheating.

Turn out dough from the proofing basket (right side up) onto parchment paper and score the top with a sharp knife or scoring tool.

Once pre-heated, take the dutch oven out. Place dough, on parchment, into the Dutch Oven. Replace the lid, return to the oven and bake for 20 minutes. Then, reduce the oven temp to 450°, remove the lid and bake for an additional 20-30 minutes, or until nicely browned on the top. Remove from the oven, and allow the bread to cool on a cooling rack for at least 30 minutes before slicing!

Thai Chicken Soup

I’ve always loved the smell of Lemongrass, never quite knowing what it was. It’s useful for an endless amount of things, both health and wellness related, and for around your home. Lemongrass is the perfect addition to boost a boring old chicken soup recipe and turn it into something really flavorful! This was an experiment on my part, but it turned out absolutely divine! Learn more about the benefits of Lemongrass here.
Click here to get a bottle for yourself!

thai chicken soup © emeliabird 2019

Save Recipe-04

Best Chocolate Cupcakes


I first made this cake over a year ago. I found the recipe online as a chocolate bundt cake with a mocha glaze. I took it to a small dinner party with some friends and everyone completely died over how amazing this cake was! We talked about it for weeks. Over the last year I’ve adjusted and adapted the recipe and have recently been making it as a chocolate cupcake recipe with vanilla buttercream and it’s still completely PERFECT. It’s light and fluffy, but the flavor is rich. You can eat it and you don’t feel like you’ve ingested an entire cake. It’s completely divine in every way! Last week I made these cupcakes for a dear friend’s birthday party. It’s strawberry season, and all the local farms are putting up stands on the side of the road to sell their goods. I decided fresh local strawberries would be a wonderful addition to this classic chocolate cupcake, so I went on the hunt for these local gems. 5 minutes down the road from my apartment, I found a strawberry field and a little stand with strawberries and other veggies (see massive garlic pictured above!). So, I decided to fill the middle with homemade local strawberry filling, which I quickly whipped together after baking my cakes, and topped each one with a juicy fresh strawberry. Needless to say it was a big hit, and the fresh strawberries were the perfect touch! This will definitely be my go-to recipe for future cupcakes, cakes and bundt cakes alike!

Best Chocolate Cupcakes © Emeliabird 2018


save-recipe-04

Strawberry Filling

1 Cup fresh strawberries, tops removed, and cut into quarters

1/2 Cup sugar  •  1 Tbsp. Corn Starch  •  1 Cup water

Heat strawberries and sugar in a small saucepan over medium-high heat, stirring every few moments until strawberries begin to cook down and sugar liquifies. Stir for about 10 minutes, or until your mixture resembles jam, stirring constantly so the sugar does not burn. Once the strawberry mixture begins to boil, mix corn starch and water together until dissolved. Slowly stir the mixture into your strawberry mixture, stirring constantly until it begins to thicken. Remove from heat and allow to cool.  Once your cupcakes are cooled to room temperature, using a small paring knife or corer, cut a small well in the middle of your cupcakes and fill with strawberry filling. Top with your frosting and enjoy!

Simple Granola

Granola was never my favorite snack of choice, until I started making it myself. I’ve tried a number of different recipes after searching through pinterest for just the right one. Some called for nut butters, others for lots of sugar, or ingredients I didn’t really like. Eventually I found one that I preferred, but have tweaked it so much, it may as well be my own creation! I’m biased, but I think it’s the best! I love to have my granola with almond milk, or over greek yogurt. It’s the perfect amount of sweet and crunchy, but not too sticky or bland. This has become a staple in my kitchen. I love having it on hand for a quick breakfast on-the-go, or a nighttime snack. It only takes about 30 minutes to make, and stores for up to 4 weeks, or longer in an airtight container!

Fruit & Nut Granola © Emeliabird 2018-02

save-recipe-04

Peanut Butter Cookies


One of my earliest baking memories was making Peanut Butter Cookies with my auntie Debbie in her tiny Pennsylvania kitchen. I couldn’t have been older than 5 or 6 years old at the time, but I remember standing on a stool in her kitchen, covered in flour, pressing a fork into little balls of peanut buttery goodness. These are a cookie often forgotten about, but when rediscovered, I’m reminded they’re one of my absolute favorites! They’re easy to make, and tend to be a crowd favorite every time I make them!

Peanut Butter Cookies ©Emeliabird 2018-02-02

save-recipe-04

Chocolate Chip Cookie Brittle

Who doesn’t love a chocolate chip cookies and shortbread? This recipe for Chocolate Chip Cookie Brittle is a marvelous combination of both chocolate chip cookie and a shortbread cookie. You can bake these in either a 9×13 baking tin or a round cake pan. They turn out lovely either way. They’re fast to make and are a unique and scrumptious addition to your dessert repertoire! Enjoy with a cup of tea!

cookie-brittle-4-emeliabird-2017


cookie-brittle-emeliabird-2017

save-recipe-04

No Knead Rosemary Garlic Spelt Bread

The last month has been the ultimate test in making food stretch, and making meals that will last me for days. So, I’ve been making a lot of soup, and of course, the perfect company to soup is homemade crusty bread. Yes and amen. I did quite a bit of bread research online to try and find the perfect bread to accompany my endless pots of soup. I tested a few recipes over the last few weeks and have tweaked this one, which I think is perfect. This rosemary garlic bread is crusty on the outside, soft on the inside, delicious straight out of the oven, or toasted with butter. I used spelt flour + all purpose flour to make it a little more nutritious. I love to toast this bread and top it with a poached egg or mashed avocado. Sometimes I’ll even spread cream cheese and blackberry jam, because sweet + savory is my favorite! Shocking, I know, but I promise it’s good. Baking your own bread at home is so inexpensive and very simple to do. I hope you try this one for yourself!

rosemary-garlic-bread-2-emeliabird-2016

rosemary-garlic-spelt-bread-emeliabird-2016

save-recipe-04

Classic Beef Stew

beef-stew-emeliabird-2016

With the weather changing and my schedule getting full, I’ve been craving warm comfort foods, and needing meals that can be stretched across a few days. Oh leftovers, here you are again, like a faithful friend. Beef Stew is a perfectly delicious and budget friendly meal that can be enjoyed with a group, or over the course of a few days (personally, I think it gets even tastier 1-2 days later, after all the herb flavors have bloomed). Altogether I got four large meals out of this one pot of soup. Woohoo! I truly hope you try this recipe and enjoy it as much as I did. I will definitely be making this again!

beef-stew-2-emeliabird-2016


beef-stew-emeliabird-2016

save-recipe-04

Pumpkin Cream Cheese Muffins

October is upon us and it’s the perfect time for all things pumpkin! Sometimes, here in the states, we take the pumpkin obsession completely overboard, but I still love it. Who am I kidding? I’m the embodiment of the pumpkin-obsessed-white girl! I don’t even care.

A few weeks ago I asked my mom to send me her best pumpkin muffin recipes, because I had some pureed pumpkin in the freezer, and I just couldn’t take it anymore! I needed pumpkin muffins. She sent me two recipes from some of the best cookbooks out there. She has had these for years, and they’re tried and true!

The American Country Inn and Bed & Breakfast Cookbook Vol 1 (Click to view on Amazon)
The American Country Inn and Bed & Breakfast Cookbook Vol 2 (Click to view on Amazon)

I slightly adapted one of the pumpkin muffin recipes by adding cream cheese in the center. Best decision of the week. I decided these are one of the best pumpkin muffins I’ve ever had. Yes, I’m proud of them! Ha!

pumpkin-cream-cheese-muffins-4-emeliabird-2016

pumpkin-cream-cheese-muffins-emeliabird-2016save-recipe-04

Small Batch Pesto!

This summer my love affair with basil has reached new heights! There are oh so many ways to use it but my favorite, by far is pesto! I grew basil from seed for my little balcony garden this summer. It’s only now getting hearty and full, so I’m grateful that the growing season in California is much longer than most places. I use my home grown basil here and there, but I’ve found basil at our local farmers market to be exceptional! Just $3 for a very large bunch and all my basil desires are satisfied.

Pesto is typically made with pine nuts, which are among the pricier nuts, but I’ve found using walnuts gives you the same texture and nutty flavor without breaking the bank. Not only can you use this herby, garlicky goodness as a kind of sauce for pasta, but I love to put it on pizza, mix it in with my scrambled eggs, spread it on burgers, and baked chicken, or even add a little oil and vinegar for salad dressing.

pesto-pasta-emeliabird-2016

In this dish I cooked brown rice pasta, topped with pesto, a poached egg, chopped fresh basil, salt, pepper & parmesan cheese. Yum!!

basil-pesto-emeliabird-2016

save-recipe-04